Adding and Removing Pages
How to add a page
To add a page, click on the pages icon on the left-hand side and then click on the “ADD NEW PAGE(S)” button.
You have the option of adding one page, or multiple pages at a time.
You have the option to choose the page type to create and the page layout. The default options are Text and Fullwidth. All pages will have a main text section. If you would like to create a page with a combination of these modules, please contact our support team.
Page types
- Text - Main text section will be added.
- Gallery - Adds a photo gallery module.
- Testimonials - Adds a testimonials module.
- Staff - Adds a staff module.
- Form - Adds a form module.
Page Layouts
- Sidebar - Adds a sidebar to your page.
- Home - Makes your page a copy of your home page layout.
- Fullwidth - The default option. Your content will take up the full width of your page.
- Blog - This layout will add a blog module.
- Articles - This layout will add an articles module.
- (Custom Options)- Custom created options added by our support team may also be displayed in this area.
Removing Pages
To remove a page from your website, click on the pages button on the left-hand side of your screen and then click on the delete icon next to the page you would like to delete.
Changing Your Page Metadata
Change the Metadata for a Page
To change the meta data for your page, click on the pages button on the left-hand side of your screen. Click on the page seo option and click on the edit button next to the page you would like to edit.
You will see areas to add a Meta Title, Meta Description, and Meta Keywords.
Meta Title: The Meta Title Serves as the title of your page in search engine results and will appear on your browser tab.
Meta Description: The Meta description serves as the description for each page in search engine results.
Meta Keywords: These are sometimes used by search engines to determine what searches your pages may display for. Meta Keywords are not often utilized by modern search engines.

Publishing Your Changes
How to publish your changes
To publish your changes, click on the publish button in the top right-hand corner of your screen.

Navigation
To edit the navigation module on your website, click on the navigation module and click edit.
![]()
You will see a list of your navigation items on the left.
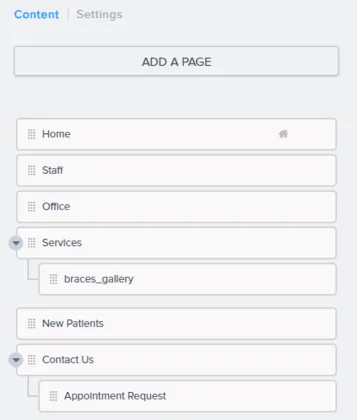
By default, all the pages on your website should be in your navigation unless they were removed.
To create a drop down, drag one navigation item on top of another. This will make make them nest. This way if you hover over services, for example, you can have a list of service pages drop down from this section. This helps with the organization of your website pages.
To add a page that was not already present in your navigation, click on the add a page button.
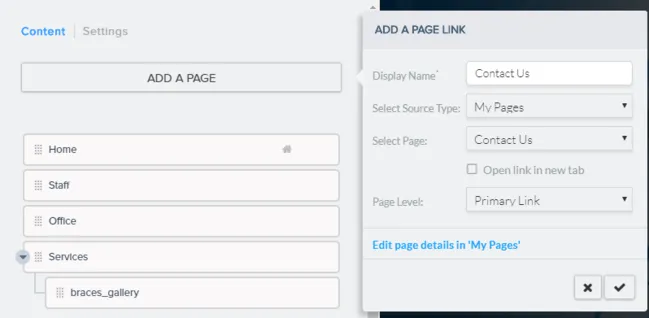
You will have the option to select a display name and the source of your pages (you can choose a pre-existing website page or you can choose to link to an external page).
You can also choose to open the link in a new tab.
Page Level Options
Primary Link: use this option if you would like the page to be a stand alone navigation item.
Secondary Link: Use this option if you would like to have your new page added as a link under another primary link in a drop down. For example, you could add a tooth whitening page underneath a primary services link.

Phone Number
To edit the phone number module, click on your phone number and then click on the edit button.
![]()
Click on the edit icon for your location.
From here, you can change the phone number for your location and click save. Your phone number should now be updated in the module.
Note: This will only update the phone number for your modules. If you have your phone number listed as text elsewhere on your website, you will need to change that manually.
Social Media
To update your social media icons, click on the module and then click edit.
To add a new social media link, select your social media platform from the drop down options and then click add.
From here, you can upload a custom icon or use a preset icon, add the link to your social page, and choose to have that link open in a new tab.
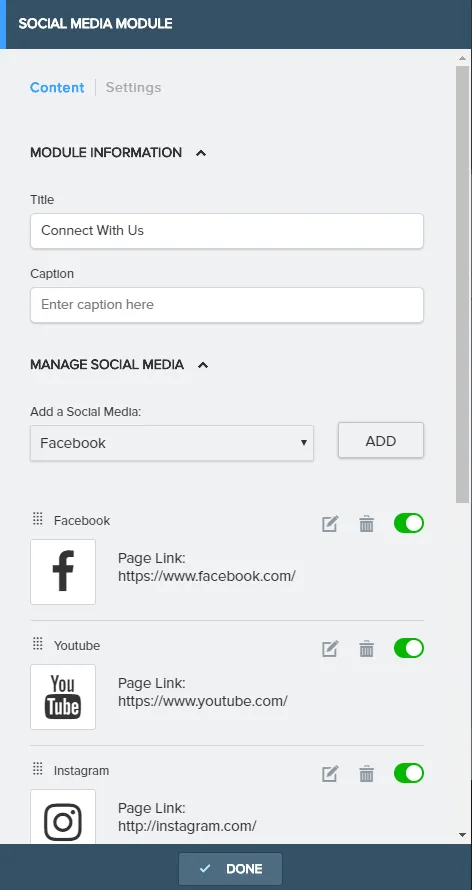
Once you have finished making changes, click save and done.
Banner (Slider)
To update your banner photos, click on the module and then click edit.
![]()
To enable or disable a slide, click on the switch.

To edit the Title, Caption, Call to Action Button, or Image, click on the edit icon.
To reorder the slides, click and hold the reorder button and drag the slide to the correct position.

To choose the layout of the text that overlays your sliders, click on the layout button. From here, you can choose to align your items to the center, left, or right.
For help with the settings on this slider module such as the pause time, speed between slides, etc. Please contact our customer care team.
Featured Services
To update your featured services, click on the module and then click edit.
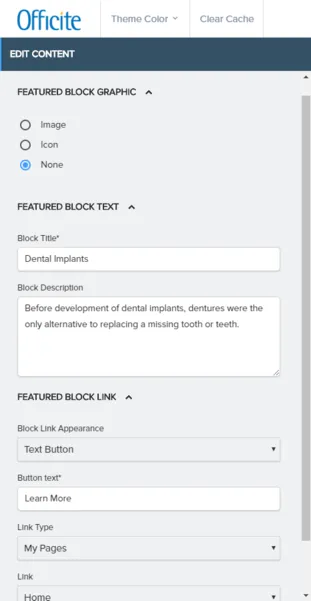
Editing Existing Services
To edit existing services, click on the edit icon next to the service that you would like to edit.
![]()
From here, you can update the title and description of your featured service block and change the page the service links to. You can also choose to include an image or icon with this service.
To change this link, click on the drop down menu under Link and choose the page you would like to link to.
To enable or disable a service, click on the switch.
To edit the Title, Description, Image or Icon, and Link, click on the edit icon.
To reorder the services, click and hold the reorder button and drag the slide to the correct position.
Adding New services
To add a new service, click on the “Add Content” button and fill in all of the information about your service.
Main Text Area
To update your main text area, click on the module and then click edit.
Start typing or deleting text similar to any word processing program. See below for specifics on formatting tools.
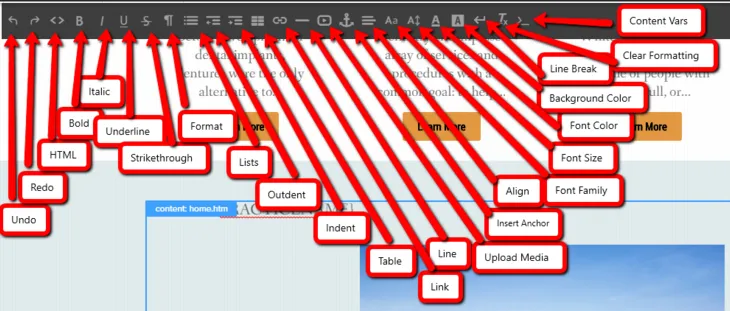
Formatting Tools in the main content area
The following formatting tools are available in our text editor:
- Undo - undo a change. You can also use CTRL + Z on your keyboard.
- Redo - Redo a change that was previously undone.
- HTML - View your main text module as HTML code.
- Bold - Bold the highlighted text.
- Italic - Italicize the highlighted text.
- Underline - Underline the highlighted text.
- Strikethrough - Strikethrough the highlighted text.
- Format - Choose the format of the highlighted text (ex. H1, H2, Paragraph (normal text))
- Lists - Create an ordered or unordered list (numbers or bullet points).
- Outdent - Remove an indentation for the highlighted text.
- Indent - Indent the highlighted text.
- Table - Create a table.
- Link - Add a link to your highlighted text.
- Line - Insert a horizontal line.
- Upload Media - Add an image or other media to your page.
- Insert Anchor - Insert an anchor to the selected text.
- Align - Aligns your highlighted text center, left, or right.
- Font Family - Change the font family or your selected text (ex. Arial).
- Font Size - Change the font size of your selected text.
- Font Color - Change the font color of your selected text.
- Background Color - Change the background color of your selected text.
- Line Break - Insert a line break (creates a new paragraph)
- Clear Formatting - Clears the formatting of your highlighted text (text from microsoft word or copied elsewhere could pull in formatting causing your text to have inconsistent formatting).
- Content Vars - Adds in a new content variable (pulls in information from your account like your phone number, practice name, etc. This is useful if you may need to change a phone number or practice name in the future. You would be able to change it in one place instead of looking through each page of your website.).
Adding a PDF/ Form to your website
To add a form to your website, you must first upload the form to your website.
- Click on “Media Manager” on the left-hand side.
- Click Upload and choose your file.
- Find and click on the file in your library.
- Click on the “click here” next to the “PUBLIC URL” option on the right-hand side of the screen.
- Copy the link in from your browser.
- Go to the page where you would like to add a link to your form.
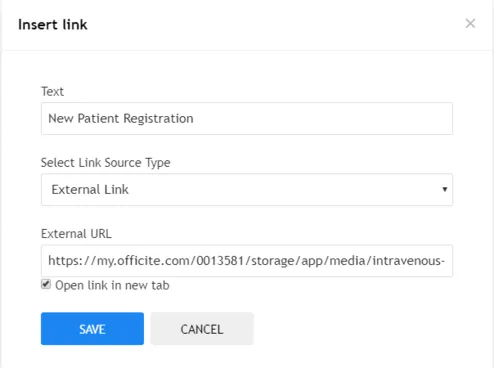
- Write and highlight the text you would like to link (ex. New Patient Packet).
- Click on the link formatting tool.
- Choose “External URL” under “Select Link Source Type”.
- Paste your link.
- Check the box next to “Open link in a new tab”.
- Click Save.
Adding third party widget code to your website
To add third party widgets to the main text area of your website, click on HTML under formatting options and add the code where you would like it to display.
Note: If you are not familiar with HTML code, we recommend that you do not do this on your own and that you contact our support team to add this code to your website.
Add a Photo
To add a photo, click on the Upload Media button. From here, you can choose to add media from the selection of media that you have previously uploaded to your website or you can upload a new image.
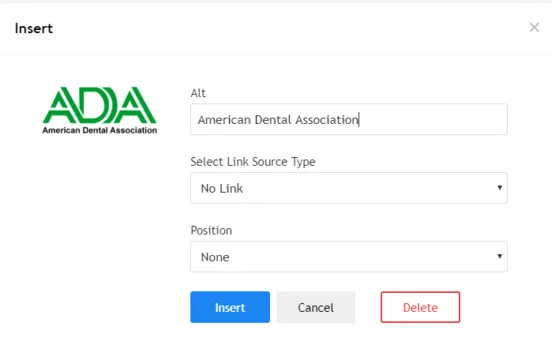
Once you have selected your image, you will need to add descriptive alternative text. Alternative text is what will display if the image cannot be displayed or read to someone who is blind. This should be descriptive.
You also have the option to link your image to a specific page and choose to center, left, or right justify your image.

To change the size of your image after adding the image, click on the image and click and drag the size slider toward or away from the center of your image to adjust the size.
Form Modules
To update your form module, click on the module and then click edit.

To change which of your forms is displayed, use the switch.
Editing your form fields
To edit your form fields, click on the edit icon.
From here, you can edit each field by clicking on the same icon next to each field. You can also add fields and remove them.
Any field with a * is a required field. This can also be adjusted in the settings of each form field.
Choosing who receives form notifications
All of your form submission data will be available in the portal. When you received a new form submission, you can choose who will receive a notification. You can either go to the form leads section of your portal to alter this, or you can click on settings in your form leads module.
From settings, you can choose what email address(es) will receive email notifications.
Staff Modules
The staff module will display all of your staff members.
To update your staff module, click on the module and then click edit.

Adding a Staff Member
To add a staff member, click on the “ADD STAFF” button.
The URL slug can just be the staff member’s full name.
If you would like to have a preview of the staff member’s bio with the full bio on another page, click on the checkbox next to “Create a detail page for the staff. This will allow you to create a separate page for this staff member with their full biography.
Layout Options
You have two options for the layout. It can either be a slideshow or a list of staff members.
Map Module
To update your map module, click on the module and then click edit.
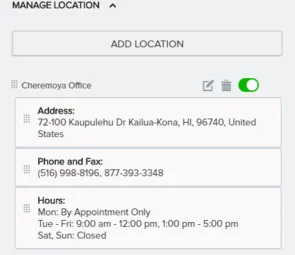
Updating your Address
To update your address, click on the edit symbol the for the address that you would like to update.
Update your address and click save. Click Done.
Adding Another Location
To add another location, click on “ADD LOCATION”
Fill out all of the location details and click save. Click Done.
Office Hours Module
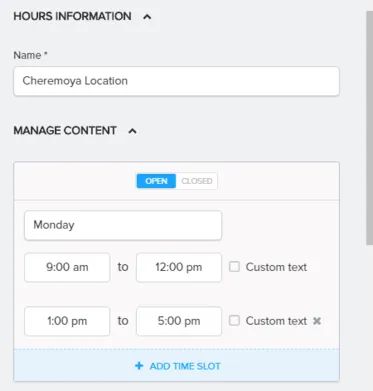
To update your office hours, click on the module and then click edit.
To edit your hours for this module, click on the edit icon.
![]()
You have the option to add time slots to each day if your office has a lunch break. You also have the option to add custom text for days that may be by appointment only or that may need more explanation.
If your office is closed that day, just click on closed.
Managing multiple offices or sets of office hours
To manage multiple offices, click on the Add Office Hours Button and add in office hours for another location.
If you have a location that may have different seasonal hours, it may be useful to add these hours into the module and turn them off. When that time or year comes, just switch the office hours you would like to display with the switch.
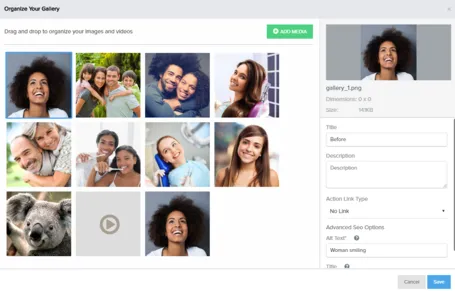
Gallery Module
To update your gallery module, click on the module and then click edit.
Adding or Removing Images
To add or remove images, click on the “Manage Media” button.
To remove an image, hover over the image you would like to remove and click on the trash can icon in the top right-hand corner of the screen.
To add images, click on the “ADD MEDIA” button and select the “Select from Gallery” option.
From your gallery, you can select and insert pre-uploaded images or upload new images to add to the gallery. To add one of these images, click on the image you would like to add and then click on the insert button.
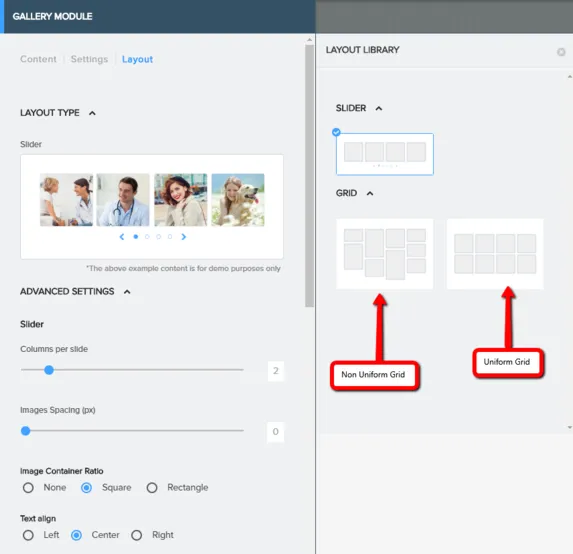
Layout Options
You have the following layout options for the gallery module:
Slider - A set of images that rotate through. You can choose how many images per slide, etc.
Uniform Grid - A grid of images automatically cropped to be square and uniform
Non Uniform Grid - A grid of images not automatically cropped but left in their default aspect ratio or cropped slightly to best fit the space.