How to Navigate through pages
By default, when you log into the website editor, the Editing button is turned on.
To navigate to a different page, click this button to Editing: Off

If your website has a menu that looks like this image, you will need to access your pages in a different manner.

Click on Website Management
Browse Your Pages
Expand All pages
Double Click on the page you would like to edit
Add a new page
Click Website Management
Click Add a New Page
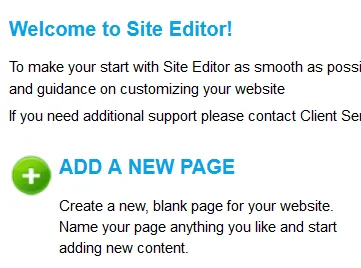
Enter the title of the page
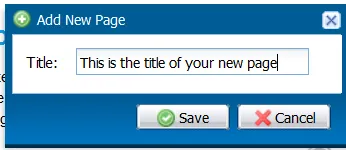
Click Save.
Begin adding content to your new page!
Removing/Disabling Pages
To remove or disable a page,
Click on Website Management
Click on Browse Pages
Click Expand All
Right click on the page you wish to edit.

Click on the checkbox next to disabled.
Click Close.
Publish your changes.
How to Publish your changes
Click on the Go Live Publish Your Changes button.

Your changes that are not yet live will appear as they do below.

Click on Go Live. Once the area under this button says published, you can select close and your changes will be published to your live website.
Note: If your website has not been published before, we will need to take it live for the first time. Publishing changes will not take your website live on your end until we take your website live initially.
Formatting Tools
By default, when you log into the website editor, the Editing button is turned on.
To navigate to the page you wish to edit, click this button to Editing: Off and go to desired page.
Once the editing button is turned on, you will see several sections of the page highlighted with blue boxes. These are the areas you can edit.
To edit a specific area, click on the Edit button associated with that blue box.

Once you click on a section to edit, the Customize Section pop-up box will appear with that area’s content.

From here, you can do the following format changes to your content:
Cut, Copy, Paste and/or Print

Undo & Redo

Find & Replace

Select All Content on the page

Remove formatting – Always use this when you copy and paste text from another source (Word, Excel, e-mail, another web page, etc.)

Bold, Italics, Underline, Strike through, Subscript, Superscript

Number or Bullet line items

Decrease or increase the indent of text

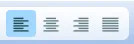
Text alignment – Left, center, right, justify
Add or remove a link, add an anchor

Add an image

Add a table *

When adding a table to a responsive website, it is important to add special coding to the table so it looks good on a mobile device. Please contact Client Services, who can assist with implementing the code.
Insert a horizontal line, special character or page break

Selecting the proper format for your content
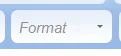
- Normal – this is used for the body of the page.
- Headings are used to help structure the web page.
- Heading 1 (H1 tag) – This is used for main heading or title and should only be used once per web page.
- Heading 2 (H2 tag) – This is used as a subheading and helps break up content into easily digestible sections.
- Heading 3 (H3 tag) – This is a lower subheading that comes after H2 tags. Never add an H3 tag if you haven’t used an H2 first.
- Most web pages typically don’t use H4 – 6 tags.
Font & Size
If you want to change the font or size of existing text, be sure to highlight that section before making your choice.
If you want to use a font that is not available on the list or want to change the font throughout the entire site, please contact Client Services at 87.393.3348.
Text colors and highlighting text

Insert pre-written content or link to an existing page

Show page blocks

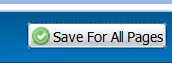
Save For All Pages – This allows you to save certain changes to every page of the website. Save all is usually for areas such as the top of the page, navigation, side bars, etc.
Save – This will save your changes on this page only.
Close – To exit the page. Be sure to save your changes before clicking close, otherwise edits will not be saved.
Add a link
Navigate to the page you want to add a link to.
Turn the Editing feature ON

Click the edit button for that section.

Type the text you would like to display for your link. For example, you can type ‘Click her to visit our Facebook Page!’
Next, using your mouse, highlight the text you are linking.

Click on the Link icon

Add the URL of the page you want to link

If you are linking to a page outside of your website, click the Target Tab and select New Window (_blank). This will open a new tab and keep your website open.
Click Ok
Click Save.
Click Close.

If you are not linking to a page outside of your website, click OK.
Click Save.
Click Close.
Publish your changes.
Add a PDF/Form to your website
To add a form on your website, navigate to the page you would like to add your form to. Then, press edit in the main text section.
- Highlight your the name of the form you would like to add and then click on the link icon.

- Click on the upload tab and select choose file.

- Once you choose your file, click on send it to the server and then click okay.
- Click on Save and Close.
- Now you can turn off editing and test your form.
- It it all works correctly, feel free to publish your changes.
Add a photo
Navigate to the page you want to add a link to.
Turn the Editing feature ON
Click the edit button for that section.
Place your cursor in the desired section of the page where the image will go. If you want to add an image next to a block of text, place your cursor at the front of the text.
Click on the Image button.
Click Browse Server.
You can now either choose an existing photo or upload a new one from your computer by clicking on upload.
Double click on the photo of your choice.

You can now resize the image by changing the Width and Height. The image ratio lock is automatically on and will re-adjust the height of the photo based on the width size and vice versa.
Note: You must make the width under 320px or the image will break the mobile website. If you need an image larger than that, make the width a percentage and the height left blank. This will adjust the image to a percentage of the size of the container that you are editing.
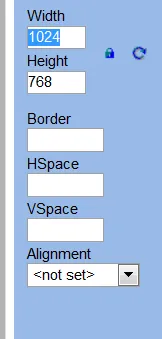
You can also add a Border to the image. Enter a number 1 through 5, for the desired thickness.
HSpace and VSpace – Allows you to add a margin above and next to your image. This is especially helpful if you are adding a photo next to a block of text.
We recommend adding a 10 for HSpace and a 5 for VSpace.
Alignment – allows you to select if the image will go to the right or left of your text block.
Click Save.
Click Close.
Publish your changes.
Change the Metadata for a Page
Click on Website Management
Click on Browse Pages
Click Expand All
Right click on the page you wish to edit.
Click on ‘Edit Settings’.
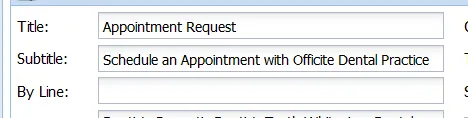
In our editor, there are two parts to a Meta Title.
Part 1: The title is the first part displayed in the complete Meta Title. This will also display as the title of your page and be visible on the page itself.
Part 2: The subtitle is the second part.
The two parts combined complete the Meta Title and will show up on search engines.
Meta Keywords: These are sometimes used by search engines to determine what searches your pages may display for. Meta Keywords are not often utilized by modern search engines.
Meta Description: The Meta description serves as the description for each page.
Once you have made your edits, click save and publish your changes.
This is an example of how your Meta title and Description would display in search engine results:

Home Page/Multi Page Editing
How to add your Logo/ Practice Name
Your Logo or practice name appears on all pages of your website in the header.
To edit this section, click on the edit box surrounding your logo or practice name.
To add your practice name as text, select the “Use Text” option and add your practice name.

To add your logo instead of text, select “Use Image File”
- Choose the image file name from the drop down. If you need to see what the images look like, or upload a new image, click on manage media and upload an image.
- Make sure to include alternative text on your logo. This text will display if someone is blind and cannot see your logo, or if your logo cannot load.
- Click on Save and publish your changes.
![]()
Note: If you have any trouble with how your logo is appearing, please contact our support team. They can adjust the logo size and do some basics edits to your logo file if needed.
How to edit the Navigation Bar/Menus
To edit the navigation bar or another menu, click on the edit button in the box surrounding the navigation.
To add a menu item, click and drag the page on the right to “my menu” if you would like to add the page to your navigation list, or drag the page on top of another menu item on the left if you would like to create a drop down.

To remove an item from your navigation, double click on the item and select remove link.
![]()
Don’t forget to save and publish your changes!
Banner Images
Banner images must be updated on our end. Please call or email us to obtain the dimensions of the photos required to update this area and to inquire about stock photo options.
Change/Add Featured Services
– Featured Services are the four main buttons on your home page.
Click the edit button

To add a featured service, similar to the navigation, click and drag a page from the left to the “available slots” text on the right.
If you need to add a different icon or further customize this section, please feel free to contact our support team.
Don;t forget to save and publish your changes!

Editing Widgets
Widgets are various areas of the website that are controlled from the website management portion of your editor instead of being edited on each individual page. You will see the image below if the area you are trying to edit is a widget.

Office Hours Widget
To edit your office hours widget, select website management and click on the locations option on the left-hand side.

Select your location on the right.
Click on Hours. From here, you can change the hours you would like displayed. If you need to list lunch hours, by appointment only, or other custom text outside of the options you see available, please contact us. We can remove the widget and allow you to add in custom text.

Click Update and Close. Publish your changes.
Note: If your office hours are displayed as text elsewhere on your website, you will need to manually update that section if it is not listed as a widget.
Map Widget
To update your location on the map, select website management and click on the locations option on the left-hand side.

Select your location on the right.
Ensure your address is entered in the same format as the address below.

If after saving, your location still does not appear correctly, select the map option in the menu shown above.

Here you can enter the exact Latitude and Longitude of your location. This will ensure that the pin on the map shows in the true location of your office.
Once you have completed these steps, don’t forget to publish.
If you have any problems getting your map to display, please feel free to contact us.
Phone Number Widget
To update your phone number, select website management and click on the locations option on the left-hand side.

Select your location on the right.
Choose the contact option and update the phone field.

Make sure to click update, close, and publish your changes once complete.
Note: This will not update all numbers across your website, only those numbers that are coded as widgets. If you have a phone number in text elsewhere on your website, you will need to manually update the text on that page.
Social Media Icons
Please contact Officite to add your social media links to your website.